Friday 28 February 2014

Nail Art Ideas Linkup - February - Glitter


Hi all!

This mani was sitting in my micro-vault since before Christmas... it was high time this came out to play! And I'm still loving this colour combination. Yay for great glitter polishes!


Polishes from left to right:
  • Essence - 128 Let's get lost
  • L.A. Colors - CNP512 Edgy
  • L.A. Colors - NP447 Jewel Tone

Excuse the lower quality of the photos, I didn't have my daylight bulbs back then, they do make a difference *winks*. Edgy is a jelly, so I think I am wearing four coats in my pinky. Probably two or three on my index and middle finger, and then topped with two coats of Jewel Tone. My thumb and ring finger have two coats of Let's get lost and some purple round studs I bought on eBay.


It's very obvious my photos have improved with my daylight bulbs, good thing the micro-vault is empty now. Well, except for some swatches of two ILNP multi chromes, but those might be stuck there forever.

More glitter down here!

Thursday 27 February 2014

Golden Oldie Thursday - Orange


Hi all!

For today's Golden Oldie Thursday I'm keeping it short. I totally forgot to edit the photos last night, so this post is already a few hours later than usual.


Polishes I used:
  • Catrice - 04 Orange-Utan
  • Rimmel - 800 Black Out

I don't own many orange polishes, this one is my oldest, but it's probably about 10 months old. I use it mostly for nail art though.


A little skittlette mani combined with black. I needed two coats for opacity for both the orange and black nails. On my thumb and ring finger I used a striper brush and Black Out to freehand the stripes. My Black Out is getting thick, so this wasn't the easiest. I painted silver square studs with Orange-Utan and let those dry. The only nail I could fit a row was my index fingernail, otherwise I would have had to cut the studs and that just looks odd as they're curved. Everything was topped with Glisten&Glow's HK Girl topcoat.


I do like using painted studs, but I lost one after a day, boo!

Do check out the other orange manis!

Tuesday 25 February 2014

Tri Polish Tuesdays - Molly on fire


Hi all!

Today is the last mani with this month's Tri Polish colours Brown, pink and grey. Well, actually just two, pink and grey. I did this mani nearly a month ago, hence the long talons, but in planning the TPT manis it got moved to be the last one.


Polishes:
  • I Love Nail Polish - Molly
  • I Love Nail Polish - A.C. Slater

And MoYou London Fairytale 03. I used the fire in the center of the plate again, but it's not recognisable as flames today. Completely different look compared to the first time I used this part of the plate, see here.


I started with 2 easy coats of Molly. On my index and ring finger I added silver round studs. I painted the studs with A.C. Slater with a small nail art brush. On the other fingers and thumb I sponged the tips with A.C. Slater and stamped with the fire image also using A.C. Slater. Everything was topcoated with Glisten&Glow's HK Girl topcoat.


After writing this post I wish my nails were this length again, but I'm afraid that'll take a while *pouts*. Anyways, next week it's March already and we have new colours to work with! Green, blue and purple! My favourite nail polish colours, yay!

Do check out the other manis for this month's last Tri Polish Tuesday below!

Sunday 23 February 2014

FingerFood's Theme Buffet - Cute


Hi all!

Today's theme is cute. And I've got some owly cute in the form of YRNAILS decals! This will be a picture heavy post, so you're warned!


Let's start with the polishes I used:
  • LynBDesigns - White Fang
  • NYC - 013 Aqua Mystic
  • NYC - 014 Magic Earth

And I used MoYou London Mother Nature (Landscape) 03 stamping plate as well.


I ordered some (water) decals from YRNAILS a couple of weeks ago. They've been sitting there waiting until I found some time to use them. Today's cute theme is perfect, because I have the cutest owl decals! YRNAILS is based in the UK and they sell nail decals in all sorts of designs, full nail wraps and nail polish. They can't ship their nail polish outside of the UK because of postal regulations though. Their prices are fair, £1,25 (€1,45 / $1,94) for most nail decals and £1,50 (€1,74 / $2,33) for a set of nail wraps. You can easily change currency at the top of their website. Each month they feature some of their products on sale as well.


This image above shows how it's packaged, fits a normal sized envelope. Below I've laid out what I bought from them. The nail decals have 23 images in 3 sizes, the full nail wraps have 20 images in 5 sizes. The smallest full nail size is a lot bigger than my smallest nail.


Instructions how to use the decals. They provided freebies for testing, which is great! And below my cute owls I'll be using today. Mind you, this is the first time I ever used water decals, so I have no idea how decals from other shops compare to these.


Cut out the image you want on your nail. I decided on the largest Winking Owl to place on my thumb. As you can see I stamped some foliage on it before I applied the decal (this is before cleaning up). Place the decal in some warm water and soak for 10-30 seconds. I found out shorter is better, I'll tell you why later.


After some soaking the images comes off the white backing paper easily. Carefully place them on your nail and press lightly to flatten it out.


Finish it off with topcoat to seal it in. I found it difficult to get them flat enough, but it's easier if you apply a layer of topcoat first and apply the decal while your nail is still tacky. You can't slide it around, but it does stick better in my opinion.


Now why you should soak shorter... see how my blue Sleeping Owl and my green Shocked Owl appear faded? I found that soaking them too long makes the image bleed onto your tissue/finger when applying to your nail. The shorter soaked ones didn't. Lesson learnt.


On my right hand my purple Goggly Eyes Owl soaked shorter, giving the crisp image you really want. I messed up one of the decals for my right hand (soaked too long and it folded), which is why you see one more stamped nail. I do like that stamped index nail though *winks*.

Do you think these owls are cute enough? Have you tried water decals before?

For more cute, check below!
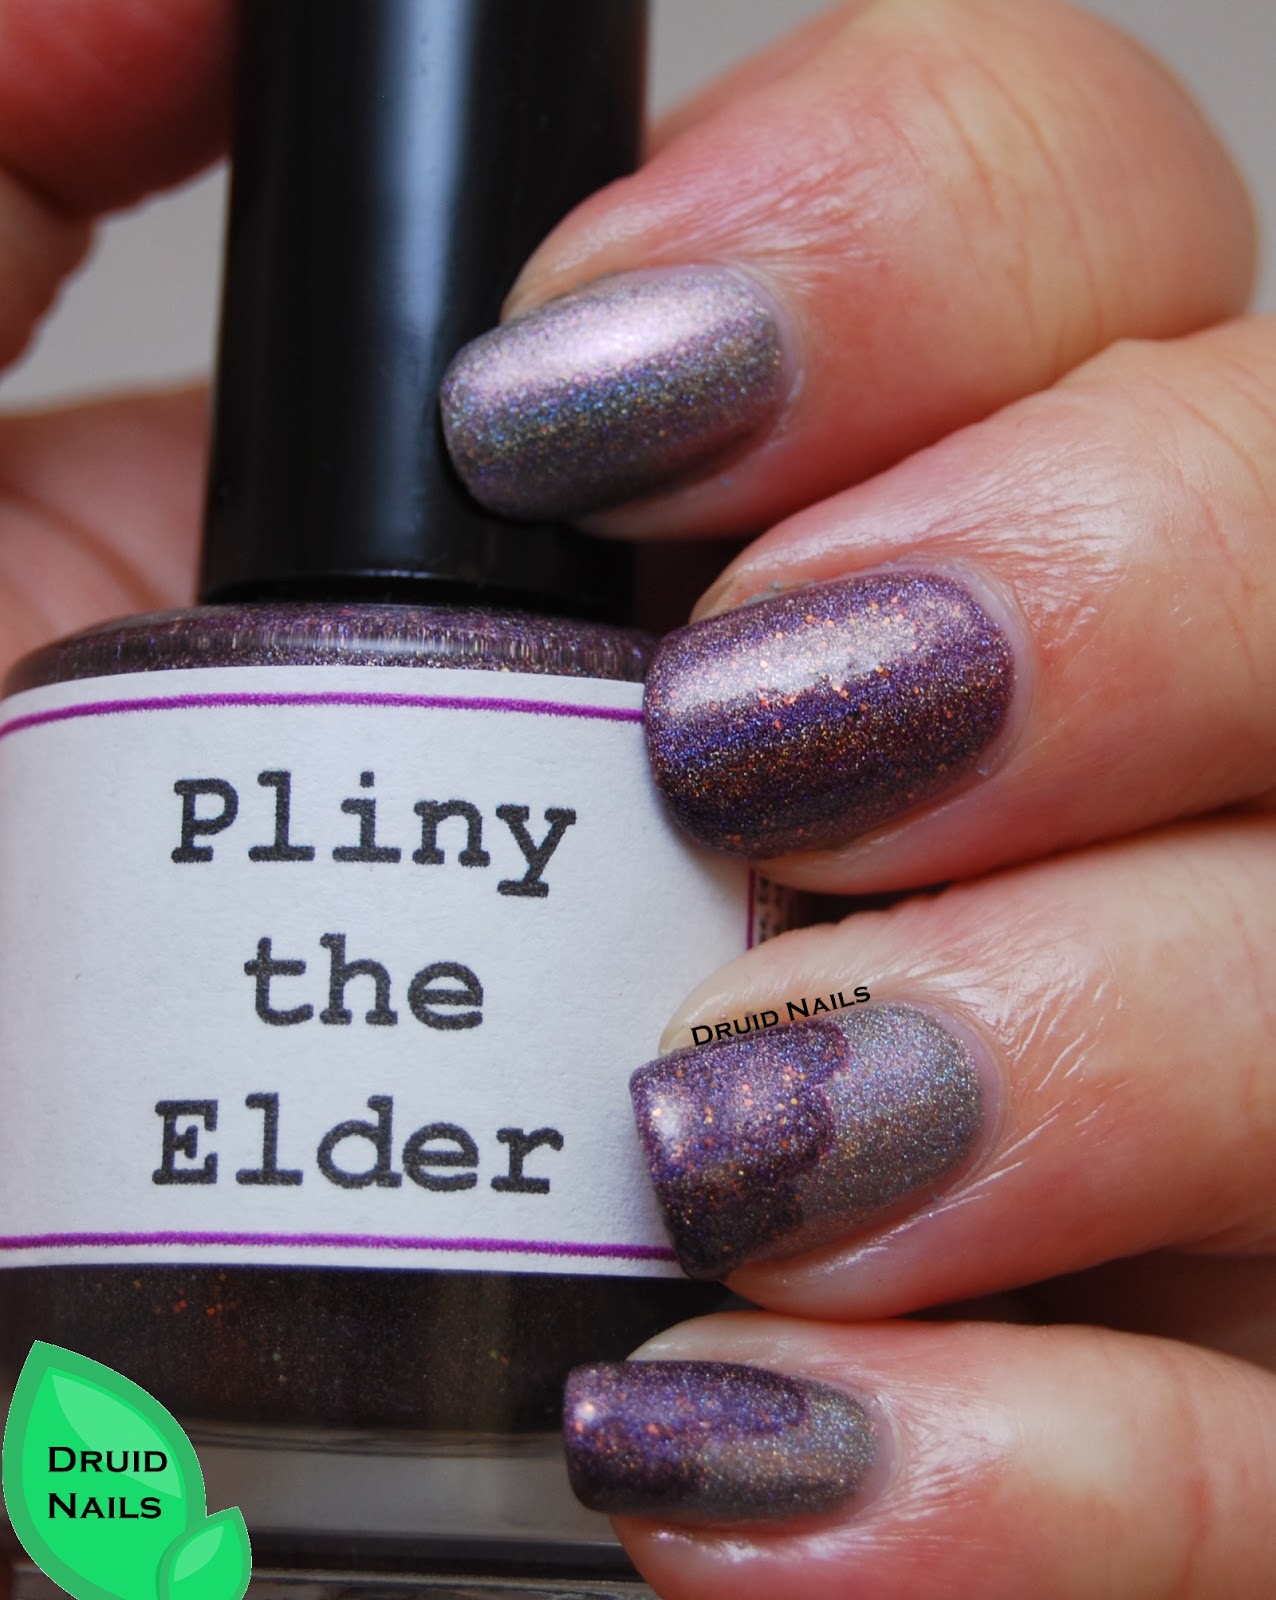
LynBDesigns - Double Bluff, Pliny the Elder and IOU

Hi all!

I had planned to finish this post earlier, but life got in the way, which means I am writing this with eyes ready to close for the night (and a cat between myself and my keyboard). Last month it was the anniversary of LynBDesigns, she had an amazing sale with 50% off. I could not pass this up and bought several polishes. They arrived last week, and I haven't had time to swatch them all (except on a swatchstick), but I do have a few I have to show you today. Why today? Because LynBDesigns has another 50% off sale this weekend! The occasion is Jenna's mum's birthday, yay! Use the code MOOMY to get yourself some lovely polishes cheap here! All polishes are inspired by different fandoms, there are nearly too many to choose from! And if you order Saturday (it still is Saturday in the USA obviously) you get a Limited Edition polish for free!


First we have Double Bluff and Pliny the Elder from the "They Say of the Acropolis" collection, inspired by the show QI. Both are holographic, but different.


Since my time was limited, I decided to show you both these polishes in one mani. They look lovely together as you can see. Double Bluff is a taupe meets rose pink, a gorgeous nudish polish, opaque in 2 coats. Pliny the Elder is a dark berry with orange mini hex glitters, which makes this interesting in indirect light as well.


And then you catch some sun... it just explodes on your nail. You have to own these two, you really do!


To show off IOU from the Baker Street collection (inspired by Sherlock) I decided to go for some simple nail art. I used the following polishes:
  • LynBDesigns - IOU
  • LynBDesigns - White Fang
  • NYC - 003 Prey of Grey
  • W7 - 28 Black
  • Miss Helen - 125


I am wearing two coats of IOU on my index finger, ring finger and pinky. You can still see a tiny bit of visible nail line, but even I did not mind. I topcoated with Glisten&Glow's HK Girl Topcoat. For my accents on my thumb and middle finger I am wearing two coats of White Fang. I have a love/hate relationship with white polishes. I am not good at applying them. LynBDesigns polishes come with round brushes, which is just fine for any polish, but I could not get an even application with two coats. I totally blame myself, as you can see the other polishes went on like a dream with the same brushtype. Normally I prefer flat brushes, but even with a flat brush I stole off another polish I have, it took very careful application to get it nice and even in 2 coats. Perhaps one day I'll master the technique to apply white polish better *winks*. Using a striper brush I added the waterfall mani with the grey, black and red polish. This is actually my first waterfall, I have seen The Nailasaurus do them lots of times, and it was easier than I thought.


And some bottle shots of two other polishes I bought. I didn't have more time to show you a mani with them unfortunately.


Now hurry with the shopping at LynBDesigns, before you know it this sale is gone!

Friday 21 February 2014

Nail-Art-A-Go-Go - Snow Day


Hi all!

I wanted to do more of this challenge... but it's just not happening. Today's theme is Snow Day however. I was wearing the awesomeness that is L.A. Girl Brilliant Blue (yes, I am totally blaming Jacqui from Craftynail for enticing me with it... I had to have it), such depth... sigh... right... back to the challenge. I was wearing this for a day, and then noticed this theme... I needed no other excuse to use my MoYou London snowflake plate (Festive 02) again. Last time I used it it was months ago, when there was still a chance we'd actually get a winter this year. But seeing as it's still a prolonged autumn that is blending into spring, winter has to come on my nails or not at all. So in a way this is a goodbye to a winter that never was. Yes, that sounds good.


My polishes:

And the snowflakes...


But first a look at Brilliant Blue au naturel. I restrained myself to only 2 photos. Try not to drown.


Of course this polish does not need anything to make it prettier, it would be impossible. But it can make snowflakes prettier *nods*. It's a reverse psychology thing.


I stamped random snowflakes onto my nails, in Blue first, and next in Pastel Blue. It isn't the best stamping, but flaws are not very noticeable from a distance. I love how this MoYou plate has so many different snowflakes, not one nail is the same.


So, goodbye winter. It was fun to wear you on my nails. I can even forgive you for taking the spotlight from Brilliant Blue. Just this once though.

Now, go check out the other snowy nails!