Saturday 31 August 2013

Turquoise studs

Last week I got another small envelope from Hong Kong containing the coloured round studs I ordered on eBay. I had to use them right away obviously. I decided to go with the sky blue ones first, I'm sure you'll see the others soon enough. I bought hot pink, apple green, purple and sky blue ones from this seller. They are 2mm in size and come in small bags of 400 pieces. From dispatch to delivery on my doorstep took 2 weeks, which is rather quick. I've ordered from this seller before with an equal delivery time.


I only used two polishes, HEMA white and KIKO Sugar Mat 637 Turquoise. I used HK Girl top coat as well. Pictures were taken in the late evening sun.


I needed 3 coats of white to get even coverage. I added HK Girl top coat and when it was dry I placed striping tape on my index finger, ring finger and pinky. I carefully dabbed KIKO Turquoise on the sides. I did 2 coats on my middle finger.


To place the studs I top coated only the center section and placed them with tweezers. I top coated it again to seal them in. The colour on the studs did not bleed from the top coat at all. I did not put top coat on the textured KIKO Turquoise.


To place the studs on my thumb I needed to dab a bit of top coat on my nail several times, HK Girl top coat dries very fast. I started with the 3 studs down the centre, then added the others on the side. I again sealed them in with top coat.


Bonus picture of one of our gorgeous white Butterfly bush (Buddleia davidii) flower panicles. It is in full bloom at the moment attracting mostly Small Tortoiseshell butterflies (Aglais urticae).


Thursday 29 August 2013

Frogs and lilypads

I have wanted to do frog inspired nails for a long time. Poison dart frogs are gorgeous creatures with the brightest colours. For today's manicure I tried to recreate their skin pattern.


From left to right I used:
  • Catrice - 11 Miss Piggy's BF
  • Catrice - 10 I'm Not A Greenager
  • Catrice - Glamazona LE C04 Lime Heart Is Beating Like A Jungle Drum
  • Miss Helen - 125
  • KIKO - Sugar Mat 644 Sea Blue
  • Rimmel - 800 Black Out

I also used dotting tools in two sizes.


First let's look at my left hand, on my thumb and ring finger I wore 3 coats of Lime Heart and used the dotting tools to apply Black Out in a pattern from the yellow-banded poison dart frog. On my pinky I attempted to do the pattern of the red-backed poison dart frog. I used Catrice Candy Shock LE Play It Blue (pastel blue) as a base and sponged some red polish on it. I added Black Out dots with my dotting tool. I'm not too happy how that looked though. I did something different on my right hand which I will show you later.


On my index and middle finger I started with a base of KIKO Sugar Mat Sea Blue as pond water. It is a textured blue polish with a silver shimmer. I think the texture and shimmer make it look like water without having to do intricate nail art. I applied a lilypad with my dotting tools using both green Catrice polishes Miss Piggy's BF and I'm Not A Greenager. I used HK Girl top coat to even it out and make the texture smoother.


I'll show you my right hand as well because I liked it better than left *winks*.


The only difference is my pinky. This time I decided to go with the amazing blue poison dart frog. Again I started with a base of  Catrice Candy Shock LE Play It Blue. I sponged Catrice Hip Queens Wear Blue Jeans over it and then added the Black Out dots with my dotting tools.


I was really happy with this manicure, even if my left index finger decided to chip after a day (photos were made after a day of wearing). My index fingers are always the ones chipping first, no matter what I wear. They are my weakest nails, hence why they are slightly shorter than the rest.

Tuesday 27 August 2013

Crazy Polish Lady - Colors of the wind

I've shown you a polish made by the indie brand Crazy Polish Lady before here, this time I have a bold pink one to show you. It is from her Memories in colors collection, all inspired by Disney princesses. Colors of the wind is a pink jelly with bold coloured glitters, inspired by Pocahontas. I've combined it with a simple nail art on my accent nails.


From left to right:
  • Catrice - 790/27 The Pinky And The Brain
  • Catrice - 400 Blue Cara Ciao
  • KIKO - 378 Light plum
  • Crazy Polish Lady - Colors of the wind


First a close-up look at Colors of the wind. It is a hot pink jelly filled with hex matte glitters. There are pink, green and red small hexes and red, blue and purple larger hexes. I am wearing 3 coats, it applied perfectly.


On my accent nails I started with a base of KIKO light plum, I then used a fan nail art brush to add stripes with Catrice The Pinky And The Brain (narf!) and Blue Cara Ciao. Because these are all darker colours the effect is subtle. I plan to use the fan brush with different colours sometime soon, a light base will show off the effect better.


I love Colors of the wind, it is bright and bold. If you'd like to own some of the Crazy Polish Lady polishes, contact her by e-mailing her or messaging her on her Facebook page. Her contact details are on her website. I've found her to be very friendly, payment is handled with paypal and she will provide a tracking code for the shipment of your order.

Sunday 25 August 2013

EverQuest2 inspired druid nails - Guest post for Polished and Glittered

I did a guest post for Polished and Glittered! Go check it out here! They were inspired by my Dwarven druid in EverQuest 2. I'll leave you with a teaser picture, hurry over to Polished and Glittered to see the full manicure.


Mrs and Mr Glitter

Glitter top coats come in all sorts of varieties, most normal nail polish brands use similar sized glitters. Essence however has one glitter top coat with bigger hexagon glitters: Mrs and Mr Glitter. I wanted to wear it in combination with nail art. I chose my polishes to match the colours of the glitter.


From left to right:
  • Catrice - 42 Nickel Minaj
  • Catrice - 810 ACid DC
  • Essence - 13 Mrs and Mr Glitter
  • Rimmel - 800 Black Out
  • KIKO -  Sugar Mat 637 (turquoise)

I also used crafting scissors and tape.


I was wearing a base of Nickel Minaj and added 2 coats of Mrs and Mr Glitter on my thumb and ring finger. I used my crafting scissors to cut tape and applied that on my other nails. For my pinky and middle finger I just placed the tape down the center of the nail, covering half of it. I added one coat of polish on the exposed side and removed the tape while the polish was still wet. The tape I placed on my index finger was cut double sided and placed in the center, leaving the sides exposed. This time I used 2 different colours on each side of the tape, again removing it while the polish was still wet. When everything had dried well enough I added a coat of HK Girl top coat.


Mrs and Mr Glitter is a fun glitter topper with metallic green and turquoise hex glitters and the occasional black ones as well. You do need to take care and dab the glitters in place, or you'll have them clumped together in one spot.


As I mentioned in my post on Nickel Minaj that polish shows brush strokes very well. Wearing it on it's own would annoy me, but combined in a nail art like this it looks lovely. Using crafting scissors is easy, fun and makes this manicure very interesting. It looks intricate and difficult, but it really isn't.

Friday 23 August 2013

Max & More Nail stamp set

A while ago I bought a small stamping set at Action, a discount store we have here in the Netherlands. I paid a whopping € 0,99. I did not expect that much, but wanted to try it anyway.


The set includes the following:
  • one image plate
  • one small stamper
  • a plastic scraper
  • a tiny stamping polish, 2 ml.

When I was there they had 2 different sets, though it could be more. Some sets came with a tiny white polish instead of the pink one. On the back there are directions on how to use this.


The image plate was protected by a layer of clear film, the scraper is completely plastic. Most scrapers have a metal dull blade that could scratch your plate if it is damaged. Most people use an old plastic card (like a gift card or credit card) instead. No need for that with this set, you can just use the plastic scraper without fear of your image plate getting damaged.


The set I bought had an image plate with 9 small designs. Two floral designs are the same, just mirrored. I'm not too fond of these designs myself, I prefer more abstract and larger designs. The double roses are cute though, I can see myself using those. Designs are very much a personal choice, I will let you decide on your own if you like them or not *winks*. They transferred just fine onto paper using my Essence black stamping polish.


The images transferred to the nail fine with the black stampy polish. I'm not the world's best stamper, I don't do it often enough, so any flaws are from my lacking stamping abilities.


The pink stamping polish that came with the set is rubbish. It was not opaque enough and did not transfer well at all. It also smells awful.


Verdict: a nice little set worth the low price I paid if you like the designs, but you will need to use other polishes for stamping.

Wednesday 21 August 2013

Catrice - Nickel Minaj

Today I will be showing you another one of the new Catrice polishes: 42 Nickel Minaj. Nickel Minaj is a silver metallic polish. Or nickel coloured if you prefer *winks*. I think the name is a good pun as with most Catrice polish names.


Metallic polishes have a tendency to show brush strokes very well, and this is no different. Unfortunately. I am wearing 2 coats with top coat in the pictures below.


Application was easy, it dries fast as with most Catrice polishes. Formula was good, not too thick and not too thin.


I did not have a silver polish yet, so it is a welcome addition to my stash. Because this polish is so streaky, I would not wear it on it's own. It does make a good base for nail art though. Or I'll use it when I want a silver accent but not silver glitter.

Monday 19 August 2013

Casuelle colour changing polishes

There are several brands that have colour changing polishes, most of them indies. When I found out that Casuelle had them as well and for much less, I had to get them. I bought mine at Intertoys (Dutch toy store that sells a small selection of beauty products as well) for € 2,49 each. They are also for sale here.

There are four different polishes. Let's take a closer look. Be warned, this is a very picture heavy post. To get these bottle shots I held them under running hot water until half the bottle had changed colour.
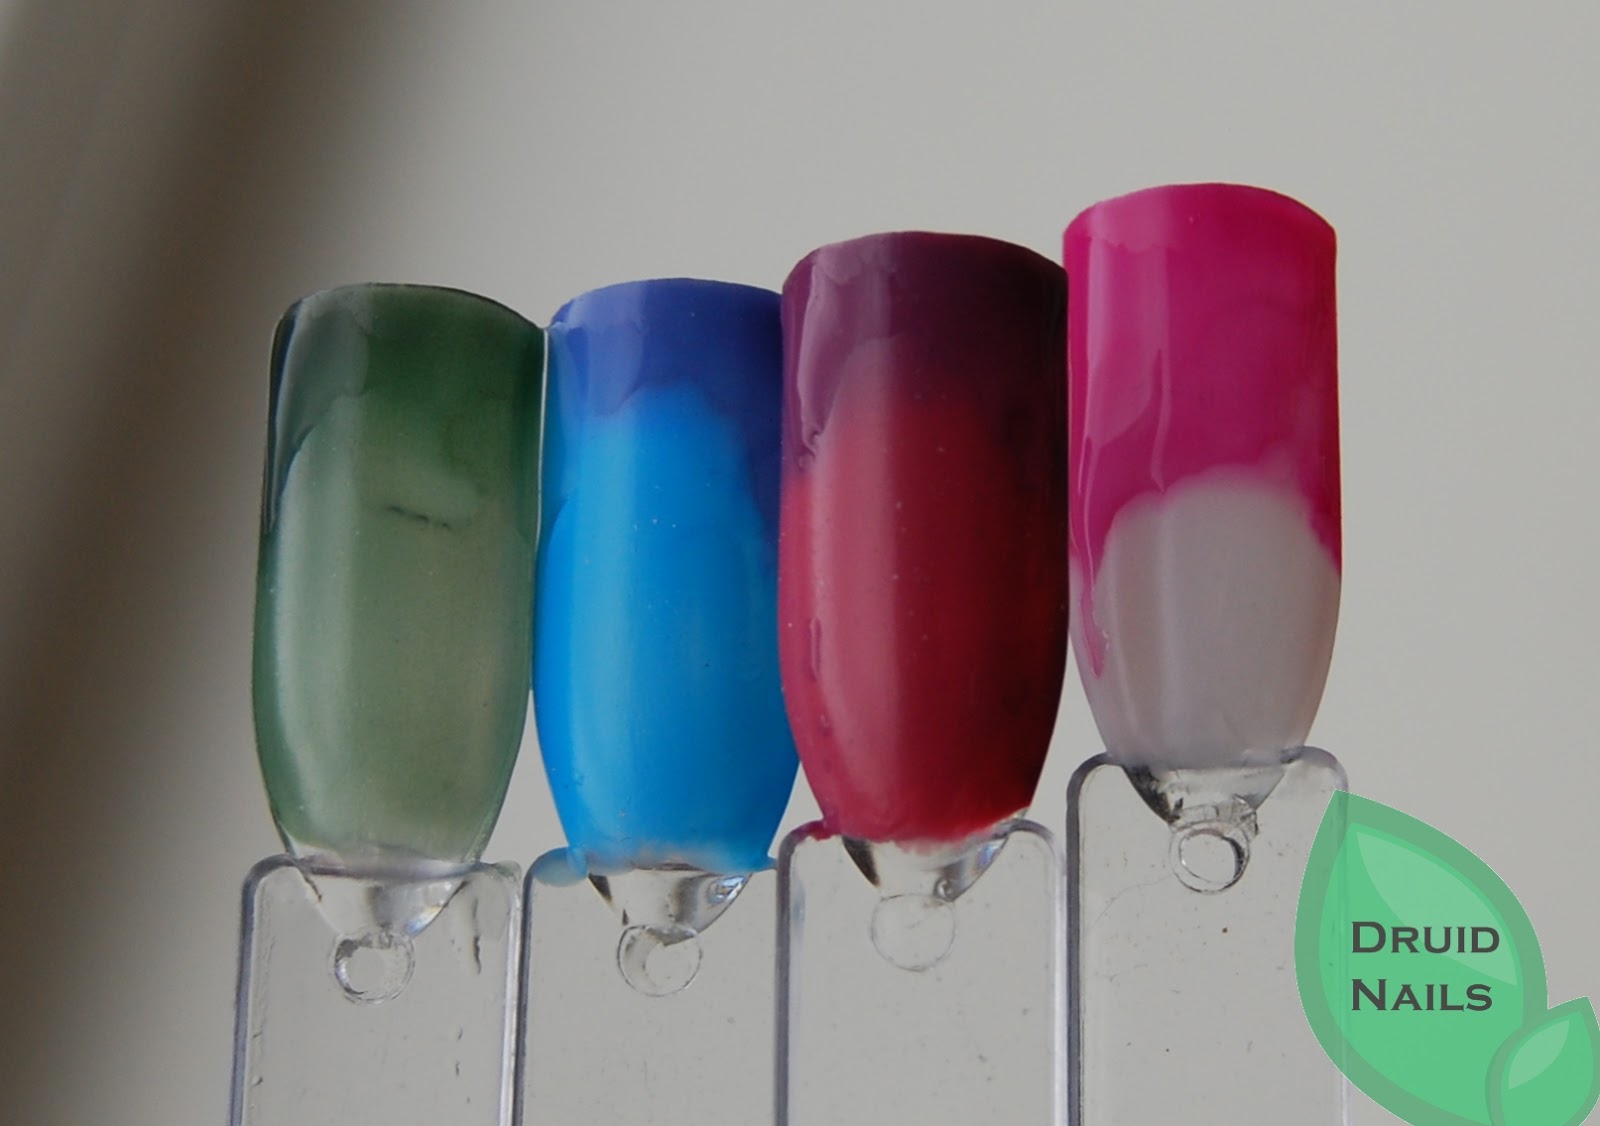

From left to right:
  • Casuelle - Colour changing polish # feel like sky is the limit
  • Casuelle - Colour changing polish # feel like midnight sky
  • Casuelle - Colour changing polish # feel like moonlight cherry
  • Casuelle - Colour changing polish # feel like daydream dancing


Feel like sky is the limit is a mossy green with a very subtle colour change. In the bottle you can see the warm colour on the left, the cold colour (slightly darker) on the right.


Feel like midnight sky has a very radical colour change. It goes from dark lavender (cold) to turquoise (warm).


Feel like moonlight cherry is subtle in the colour change. It goes from plum purple (cold) to dark cherry pink (warm).


Feel like daydream dancing is another radical colour change. It goes from hot pink (cold) to white (warm).


I made some swatches to show them all, using cold and hot water for the transitions. Top picture shows swatches all cold. I used 3 coats for all of them except Feel like midnight sky which only had 2 coats. Feel like sky is the limit could probably do with another coat.


This is how they all look when warm. The pictures that follow are how they change to cold.


I wore Feel like midnight sky on my nails for two days. These pictures were taken on the second day, very slight tip wear on my index finger.


Cold nails, for the pictures I used water to change them. At work I often had them look like this as well, my hands were slightly cool. In winter or if you generally have cold hands quickly this is how the polish would look like most of the time.


During hot days, or in the sunshine the colour changes to this lovely turquoise. It is a stunning colour.


The following pictures how how the polish will look like most of the time. The longer your nails are the better you can see the colour change at the tips. If you have very short nails your nails will be warm all the time and not show the change.


I think these polishes are lovely, although it is a shame Feel like sky is the limit and Feel like moonlight cherry have very subtle colour changes. If you want the change to be obvious I would not bother buying those two. Feel like midnight sky and Feel like daydream dancing however are awesome.